You will need
- - a basic dress pattern;
- - fabric:
- - the tape:
- - sewing accessories;
- - graph paper;
- - the range;
- pencil.
Instruction
1
The easiest option rack – rectangular collar, loose-fitting round neck. Before you cut, you need to simulate the pattern of shelves and backrest in accordance with the selected style. For example, the neck can be expanded. Swipe on the templates shelves and backless a line parallel to the lines of the neck, but at some distance. Cut out details on the new contours.
2
Measure the circumference of the neck pattern. To do this is by putting measuring tape at the edge. On a sheet of graph paper, draw a rectangle whose length is equal to the received measurements and the width and height of the future collar. Further actions depend on the form of the rack. If it is rectangular and without the clasp, cut a rectangle, fold the piece of fabric in half on the duck, prick the pattern so that one long edge coincides with a bend. Add a short slices of 0.5 cm for percent and allowances of 0.5, see Cut out detail.
3
Fold the rectangle in half right side out, fold and zautyuzhte. Fold the collar wrong side up, baste and sew the short seams.
4
Baste the outside part of the collar to neckline with folded detail, right sides together. Try it out, pristrochite collar. Baste inner part and pristrochite on existing line.
5
Collar with notched top edge or rounded corners sewn almost the same, but of two identical parts. Allowance for percent need to add not only short seams, but also along the upper. Take them out, fold right sides and sostrochite side and top seam. If necessary, cut in a few places the seam allowance or cut the internal corners so the finished product is not bristled. All other work is done exactly as in the manufacture of a rectangular collar.
6
Stand-up collar can be with clasp. In this case, draw a rectangle and then increase its length to the width of the strap, multiplied by 4. This type of collar is sewn to dress exactly the same as the previous one, with the only difference that it is necessary to plan in advance a place for a loop.
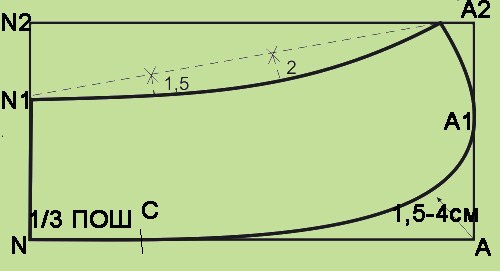
7
Tight collar cut out somewhat differently. This collar should be curved, and the more it will be, the denser will stand snugly to the neck. Building patterns start with a rectangle whose length is measured on the patterns of the poluobhvat neck. Then from the bottom left corner put on the long side 1/3 poluobhvat. Put, for example, the point C. From the lower right corner up set aside a period of from 1 to 4 cm, depending on stand height and how attached you want to make a collar. This new point (e.g., A1) connect With a smooth line. From the upper left corner, swipe the curve of a line parallel to the just-drawn arc. The extreme point should be directly above the bottom right corner. If necessary, make the zipper extend to the desired length of the collar, raised up. Assembled and stitched this collar is exactly the same as rectangular.