Instruction
1
Before proceeding to the lines, configure the appropriate display mode of the page. Click the View tab, make sure that in the "Modes of viewing of the document" on the toolbar is set to "print Layout". In the "Show or hide the" set the marker in the "Line". This will help to visualize and to evaluate whether you have chosen the height of the rows when markings.
2
Go to the View tab and find the "page setup". Click thumbnail Size and choose a suitable document format, by clicking in the drop down menu on the appropriate row with the left mouse button. When you output a document to print, the size of the electronic page needs to match the size of paper sheet.
3
In the same section click on the thumbnail Fields and select the context menu item "Custom fields". This will open a new dialog box. On the Fields tab in the same group, set the desired values for the right and left field, perhaps the markings on your sheetand exceeds the values set by default.
4
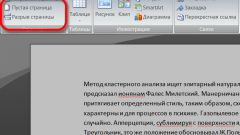
Open the "Insert" tab. In the "Tables" click on the thumbnail table. Unfold the menu. Using the layout, select one column and the maximum number of rows. Or call the menu command "Insert table" and specify in the dialog box, the desired number of columns and rows. The table will be created with the specified parameters.
5
If the table lacks rows, highlight with the mouse as many strings as you want to insert in the context menu "Work with tables" tab "Layout" and click "Insert above" or "Insert below" in the "Rows and columns". To clean side edges of the table, click on the design tab, select the Eraser tool and drag on the right and left border.
6
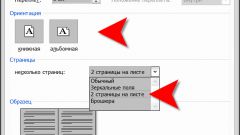
To specify exact row height, select the table and click the right mouse button. In the context menu select "table Properties". This will open a new dialog box, click in it, tab, "String". In the "Size" section of the "String" set the marker in the Height field. In the adjacent field, located just to the right, enter the desired value in inches and click OK.